The comprehensive music management platform for music departments
Managing instrumental lessons
with ease
Pratice Pal Music is the music standalone version of involve. It works alongside your school’s MIS to reduce the amount of time, and headaches, spent on logistics and admin. Its intuitive design, created by a former music teacher and machine learning graduate from Cambridge graduate, uses the most advanced technology to streamline your team’s workload.
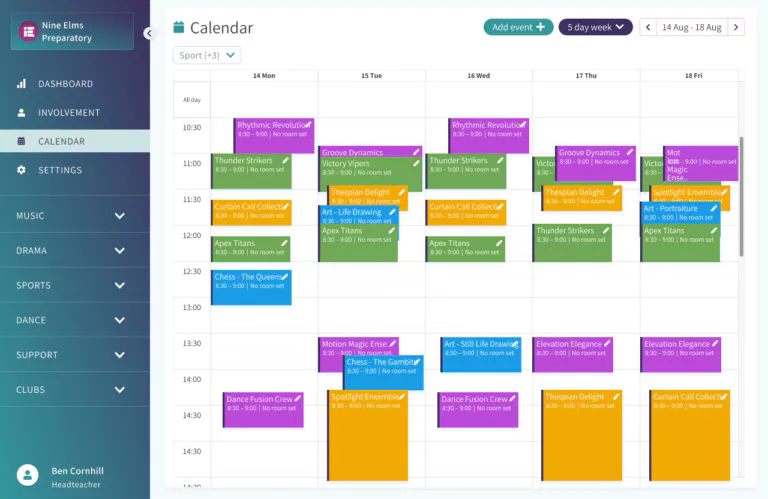
Timetables in one click
with Magic Scheduling
Our bespoke AI-powered algorithm creates the best possible timetable accounting for previously missed subjects, academic subject restrictions, ad hoc activities, and teacher availability. All in one simple click.
Automatic subject teacher communications with MIS Integration
Instrumental teachers can record the attendance of all their students, and teachers will be notified which students will be attending music lessons during their subject.
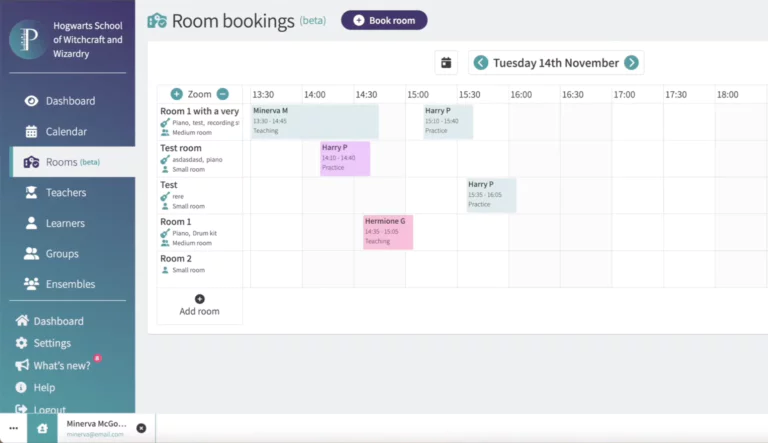
Easily reserve school facilities
with Room Booking
We’ve simplified room reservations for teachers and students alike. Book lessons, rehearsals, or practice, and see which instruments and equipment are available. The feature offers flexibility, last-minute changes and prevents double bookings.
Mark individual and group attendance, set up unique codes and link to the billing feature.
Attendance Writeback
Instrumental teachers can record the attendance of all their students, and teachers will be notified which students will be attending music lessons during their subject.
Safeguarding & registration
If a student does not turn up for their music lesson, teachers and administrators can see which subject the student is in.
Automatic parent notification
Parents are kept in the loop with their child’s progress without manual emails.
Billing
Make accounting easy - visiting teachers can raise invoices with all relevant data imported.
Progress tracking
Mark attendance, make notes and share attachments and media with parents and students.
Our Practice Pal app is now available for teacher, parents and learners
Integrates with every popular Management Information System
Find every system we integrate with along with helpful setup guides on the Wonde website
We use cookies to ensure you get the best experience on our website. By clicking “Accept”, you consent to the use of ALL the cookies.
Manage consent
Privacy Overview
This website uses cookies to improve your experience while you navigate through the website. Out of these, the cookies that are categorized as necessary are stored on your browser as they are essential for the working of basic functionalities of the website. We also use third-party cookies that help us analyze and understand how you use this website. These cookies will be stored in your browser only with your consent. You also have the option to opt-out of these cookies. But opting out of some of these cookies may affect your browsing experience. For further information please read the cookies section in our privacy policy: Privacy Policy
Necessary cookies are absolutely essential for the website to function properly. This category only includes cookies that ensures basic functionalities and security features of the website. These cookies do not store any personal information.
Any cookies that may not be particularly necessary for the website to function and is used specifically to collect user personal data via analytics, ads, other embedded contents are termed as non-necessary cookies. It is mandatory to procure user consent prior to running these cookies on your website.


")


